Setting DRZ-400 Suspension

Like many DRZ-400 owners, setting up the suspension was one thing I initially dismissed. I rode for a while with the stock settings and just accepted the bike’s ‘squishy’ or vague handling. In hindsight, I wish I would have addressed it on Day One.
The key to getting it right was comparative testing. By repeatedly riding the exact same 150-mile loop—first before, and then after, each adjustment—I could clearly isolate and feel the difference. This approach took the guesswork out of the process, ensuring every click and every preload adjustment moved the bike exactly in the direction I wanted.
Here is the exact, step-by-step method I used to set up my DRZ-400 suspension:
1. Baseline Ride
- Action: Complete a 150–200 mile loop on the terrain you plan to ride (e.g., gravel roads).
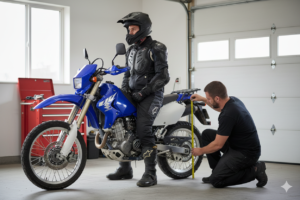
2. Setting the Rear Sag
-
Tool: Using a dedicated tool like the Slacker Sag Setter (Discount Code-DUALSPORT-30%) provides the most accurate and repeatable measurements.
-
Action: Set the rear Rider Sag using the tool. (Typically aiming for 90–105 mm).
-
Immediate Feedback: Take the bike out on the same gravel loop.
-
Key Insight: This ride allows you to realize the changes. Did it feel more balanced in corners? Did it absorb bumps better? This feedback tells you if you moved in the right direction or which direction you need to go.
3. Dialing in the Front Forks
-
Starting Point: Adjust the front forks to a neutral position:
-
Compression: 13 clicks out
-
Rebound: 17 clicks out
-
-
Testing:
-
Run the same gravel loop to set a new baseline for the Damping/Compression.
-
Next, adjust both compression and rebound 5 clicks in either direction (softer or stiffer).
-
Run the loop again.
-
-
Why it works: Adjusting by a significant amount (5 clicks) makes the change noticeable. A 1-2 click change can be too subtle to feel. Once you feel the difference between “5 clicks softer” and “5 clicks stiffer,” you will know precisely which direction you need to go to match the forks to your weight and riding style.
Conclusion
Suspension setup is one of the most overlooked areas, even on adventure and dual-sport bikes. It drastically affects comfort, safety, and confidence.
Comments
Add a comment
400 DS/ADV Events & GPX Routes
“Click On The State You Want To Ride”